Categories
Technology Tools

Automatic OCR with Hazel: The Easy Way

I have previously written about how to run OCR (Optical Character Recognition) on a PDF using Hazel and… a complicated pile of Python scripts and other software. Since I wrote that post, several of those pieces of software have been updated, and the core component has been, apparently, entirely abandoned.
Recently, while I was waiting for yet another keyboard replacement on my MacBook, I took another look at the OCR thing and found that there’s a much easier way available: OCRmyPDF.
It’s easy to install, assuming you’ve already got brew: brew install ocrmypdf
From there, it’s just a single action in Hazel. “Run embedded shell script: ocrmypdf $1
Admittedly, you can use some of their many settings to get something a bit nicer than just OCR; personally, I’m using --rotate-pages --deskew --mask-barcodes – the first two to help with variations in the input because I sometimes use a bed scanner, and the latter to help Tesseract, which can have issues with barcodes..
I’ve also paired it with a couple additional actions, just to keep everything organized:

I also took the time to stop using Dropbox as the go-between for my scanner and the Mac running Hazel; I’d forgotten that the scanner has a USB port. Plug in a cheap flash drive, and it’s available as a (very slow) file server. Mount the drive, add it as a Login Item so it’ll auto-mount on boot, and you can set Hazel automations to run right there. I’m not OCRing them there, though — like I said, it’s a very slow server, so it tags them ‘for OCR’ and moves them to my desktop.1


  1. With iCloud Drive handling my desktop, I’ve found it to be a pretty great ‘intake’ folder for all of my Hazel automations. It’s quite nice to be able to save a PDF from my phone, add a tag, and watch it disappear again as it’s auto-sorted, or throw a PDF on my desktop with a tag and see it pop in and out as the OCR runs. 
Categories
Technology Tools

Automatic Playlist Backup

You may have seen my monthly playlist posts on here; I put those together with a Shortcut that grabs the playlist, runs through all the songs, and makes a spirited attempt to fill in all the links off the iTunes Store Search API without hitting their mysterious rate limits.1
It’s not the be-all end-all, though — I’ve been wanting more and more lately to start making more and smaller playlists, things to match different moods. Y’know, the way normal people do playlists.
But, of course, I’m me, and I want to have the history of my music tastes, because, hey, sometimes you feel like reminiscing.
So, what to do? Well, I’ve done some work with the iTunes Library XML file, and while it’s sorta true that just wrapping that in, like, Git or something for version control could work, there are three problems with that:
1. iTunes is a weird, weird piece of software, and I don’t want to mess with its files too much.
2. The result is not at all human-readable.
3. It isn’t an excuse to learn something new.

So, what else can I do? Well, I’ve done a very light bit of tinkering with AppleScript,2 so I know it can interact with iTunes pretty well; there’s gotta be a way to do it there, right?
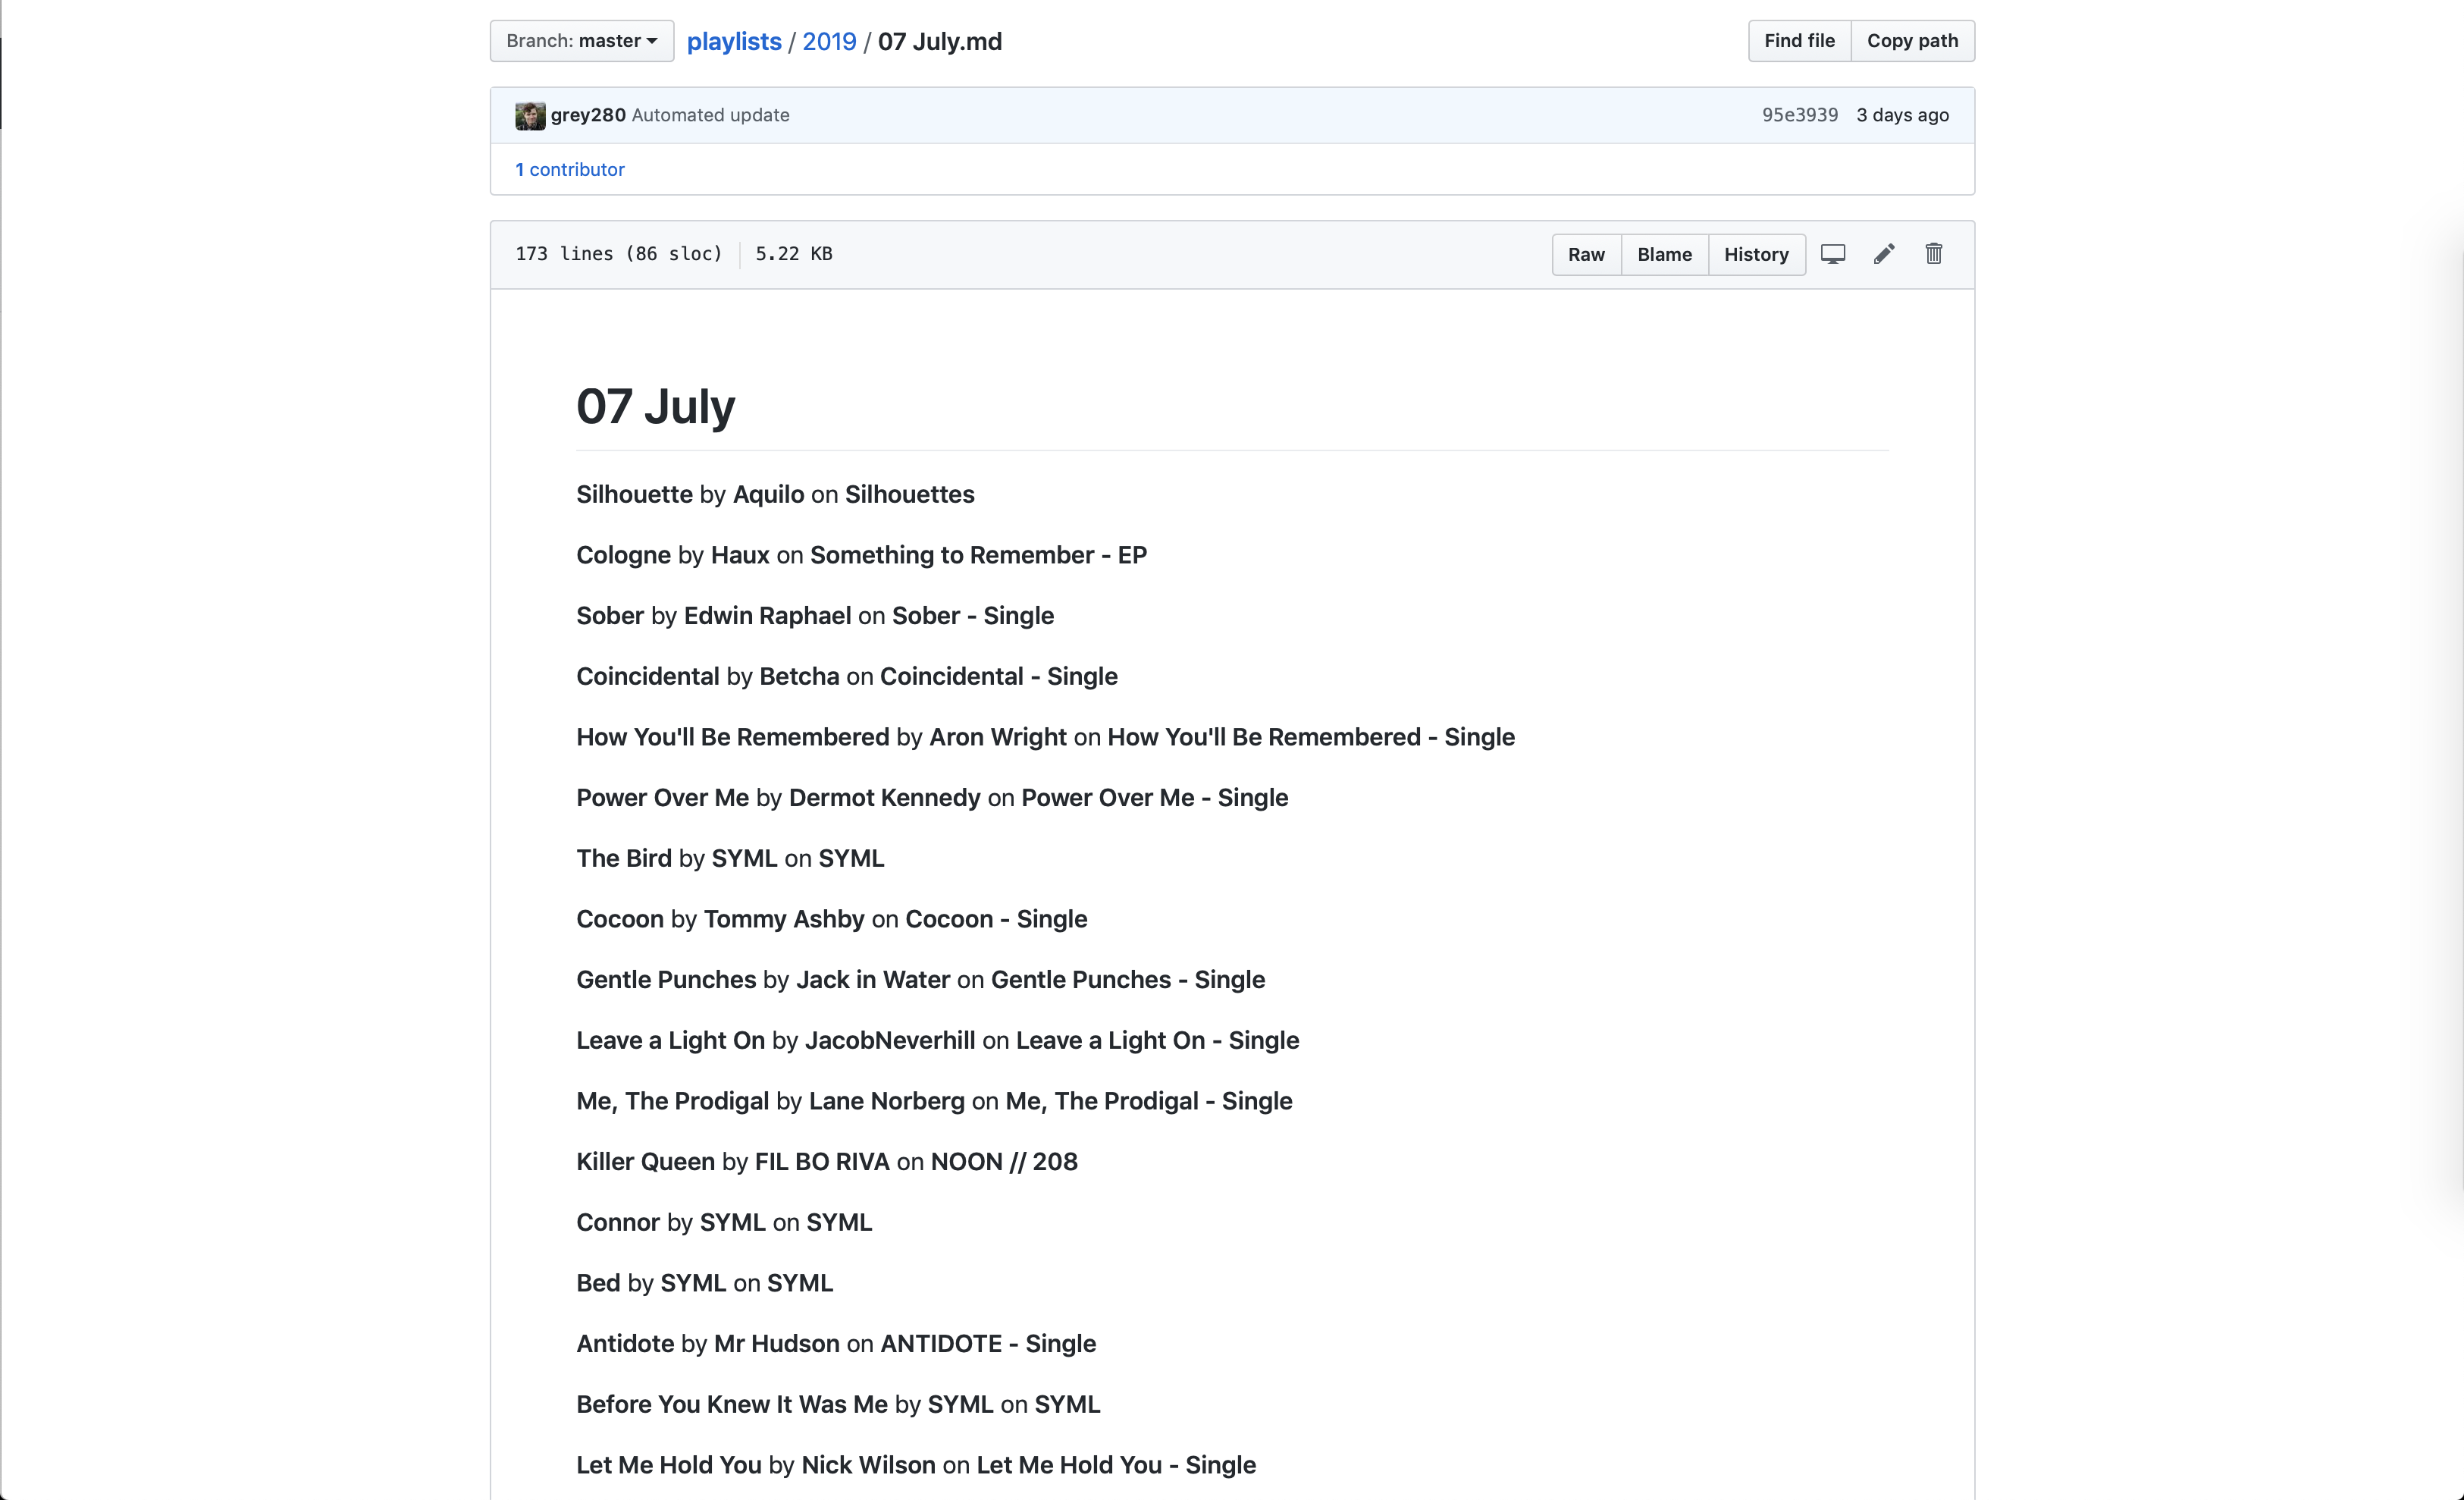
There is! I’ll share the script in a moment, but the functionality I wanted was “clear out the folder I give you, replicate my playlist hierarchy as directories, and spit out each playlist as a markdown file listing the title, artist, and album for each track, then commit the changes to a git repository.”
It took a while to get working — I’ve learned that AppleScript’s repeat with in loop is hilariously slow, unless you change it to repeat with in (get). I’ve also found out that the way it works with paths is super annoying, and that while it can write to a file, it can’t conceptualize creating a directory. There’s some great workarounds for that.
Now, here’s the script: I’ve left a couple {replace me} type things where you should fill in variables – namely, the path to your home directory (or wherever else you want it), and your own username, to fix some permission issues that can crop up.3

https://gist.github.com/grey280/9b95fdc8c16ec544a214f159bd008bbc

But wait, there’s a caveat: it’ll fail if the folder you gave it isn’t a git repository. Considering that I wanted this as a ‘set it and forget it’ sort of thing, I figured it wouldn’t be worth the effort to write a bunch of conditional code to do the setup. Do it yourself: git init && touch temp.txt && add temp.txt && git commit -m "Initial commit" takes care of all you need.4
Oh, and if you want it to be pushing the changes somewhere, because you’re paranoid and want everything in someone’s cloud, at least, add the remote and set it as the default upstream: git remote add origin {remote URL} && git push --set-upstream origin master

Set It and Forget It

So that’s pretty neat, but it isn’t really “set it and forget it,” now, is it? You’ve gotta open up Script Editor, pull up the script, and run it every time you want it to back up your playlists. Possibly workable for some people, but I don’t have a home server for nothing. Let’s make this truly automated.
From my prior experience with AppleScript, I know that you can set it off through a shell script by way of /usr/bin/osascript, so my first thought was to add a cron job. After a bit of research, though, I found out that Apple would prefer we use launchd instead, so I set about figuring out how to do that.
Now, if this wasn’t all an excuse to learn how to do something, I’d probably have just bought one of the GUI clients for launchd; Lingon looks pretty nice, and seems to work well.5
The process for writing your own launchd process is actually pretty simple: create a .plist file containing some XML, add it to the launchd queue with launchctl, and you’re off to the races!6
(Hint: if you want an easier way to see if your script runs than waiting and checking git log, you can add a line to the start of the AppleScript: display notification "Running playlist export".)
So, creating the XML: you want it to live in ~/Library/LaunchAgents/, and the convention is the usual reverse-TLD. (You can also use local.{your username}.{your script name}, but I’m so used to using net.twoeighty. in bundle identifiers that I just went with that.)
The important parts are the ProgramArguments array and the StartInterval integer. For ProgramArguments, give it the path to osascript,7 and as your second argument, the full path to the .scpt of the AppleScript.
Then, set the StartInterval to the number of seconds between runs; I’m using 3600, because hourly change tracking seems frequent enough for my purposes.
The result:

https://gist.github.com/grey280/f643a159a426ae25eb57139afd4f3cd5

(You can skip the StandardErrorPath and StandardOutPath – they help a little with debugging, more so if you’re running a full shell script and not a wrapper on an AppleScript.)
Finally, add it to the queue:

launctl load ~/Library/LaunchAgents/net.twoeighty.backupPlaylists.plist

And there you go – every hour, your iTunes playlists will get backed up to your Git repo, and you’ll have a nice history of your music tastes over time.


  1. iTunes Search is a really fun API to use, because via Shortcuts you only get a single input to it, and it is really bad at finding anything. Seriously — try to find anything off the top charts. As far as iTunes Search is aware, Billie Eilish doesn’t exist. 
  2. In lieu of Shortcuts having a way to set the volume on a HomePod, I’ve achieved a similar result with “run SSH script: osascript -e tell iTunes ...”. 
  3. Related: don’t put this anywhere with weird macOS access control things. Y’know, places like “Documents”, “Desktop”, anywhere in iCloud Drive or Dropbox, or even “Downloads”, which apparently is a much worse work directory than I thought it was. I eventually configured it to run out of and into my Public directory, because I figured that’d be easier than trying to mess around with the permissions somewhere else. 
  4. Without a file there, the git rm -rf . && git clean -fxd bit at the beginning is unhappy. 
  5. I used the ‘free trial’ version as a viewer for my works in progress; I figured if I’d done something really wrong, it’d complain about it being an invalid file or something. 
  6. He said, glossing over the couple hours of “fight me, macOS, why isn’t this working” 
  7. Probably /usr/bin/osascript, but you can use which osascript in Terminal to check. 
Categories
Programming Technology

Publishing a Private Angular Library via Git

So, you’ve built yourself a nice new Angular library and you’re excited to put it to use in your apps! It’s an exciting time. But wait: the code you used is proprietary, and you can’t upload it to NPM.1
Good news: thanks to some features of Git, NPM, and most Git hosts, there’s a way to bypass NPM, and you don’t even need to set up your own repository. Sound good? Let’s go.
Now, I’m assuming that you’ve already (a) created your Angular library, and (b) have it in Git. If you haven’t done (a), there’s a pretty good guide on Angular’s site; if you haven’t done (b), allow me to evangelize source control to you: Git is awesome, and you should be using it. This book, available online for free, is an excellent getting-started guide.
So, you’ve got a version-controlled library; how do we make it available?
1. Build the library. ng build {YourLibrary} spits out your library as a ready-made NPM package.
2. Track the built files. git add dist/{your-library}. If you’ve got that in your .gitignore, you’ll need to remove it, or git add -f. I’d recommend the former; you’ll need to do this every time you update the library. Wrap it up with git commit and a nice message explaining what you’ve changed.
3. Set up a second repository. This is where the NPM package version of your repository will live. Leave it empty; we’ll push to it in a moment.
4. Push the subtree. This is the the magic part: we’re going to treat the built files as their own separate repository. git subtree push --prefix dist/{your-library} {path to the second repository}2
5. Tag the release with a semantic version number.3 While it’s possible to do this via the command line, it’s not fun, so I’d recommend using the GUI for your Git host of choice.
6. Generate a read-only token for the second repository. In GitLab, this is under Settings > Repository > Deploy Tokens. Configure it as you’d like, but be sure to enable read_repository.
7. Add the library to your app’s package.json. Give it the Git address for your second repository, and follow it up with either a tag or branch name to pull from. (For example: "your-library": "git+https://{GitLab token username}:{GitLab token password}@gitlab.com/{your username}/{your-second-repo}#master would pull the latest version from master.)

Et voilà; you’ve got a private Angular library, ready for use.


  1. Or maybe you’ve got issues with the fact that NPM is a private company, and can remove, un-delete, or hand over your packages without your permission
  2. i.e.: git subtree push --prefix dist/my-own-library https://github.com/grey280/my-own-library.git 
  3. This isn’t strictly necessary – I’ll explain a bit more in step 7. 
Categories
Programming Technology

Wrapping UserDefaults

UserDefaults, formerly NSUserDefaults, is a pretty handy thing. Simply put, it’s a lightweight way of storing a little bit of data — things on the order of user preferences, though it’s not recommended to throw anything big in there. Think “settings screen,” not “the image cache” or “the database.” It’s all based up on the Defaults system built into macOS and iOS,1 and it’s a delightfully efficient thing, from the docs:

UserDefaults caches the information to avoid having to open the user’s defaults database each time you need a default value. When you set a default value, it’s changed synchronously within your process, and asynchronously to persistent storage and other processes.

How handy is that! All the work of writing to disk, abstracted away just like that. Neat!
Now for the downside: it’s got a very limited range of types it accepts.2 Admittedly, one of these is NSData, but it can be a bit annoying to do all that archiving and unarchiving all the time.
One solution I use is writing a wrapper on UserDefaults. Swift’s computed properties are a very neat way to do it, and any code you write elsewhere in your project will feel neater for it.
The basic idea is this:
[gist https://gist.github.com/grey280/82b91e70ef49e087a0aefe3e9374d2b7 /]
There you go: you’ve got an easy accessor for your stored setting.
Of course, we can make this a lot neater; we’ll start by wrapping it up in a class, and make a couple tweaks while we do that:
[gist https://gist.github.com/grey280/ff61d2f31a0c9f3fc2e3595a55ae9de5 /]
First, we made a variable to point at UserDefaults.standard instead of doing it directly. This isn’t strictly necessary, but it makes things a lot easier to change if you want to switch to a custom UserDefaults suite later.3
Secondly, we pulled the string literal out and put in a variable instead. Again, this is more about code maintainability than anything else, but that’s certainly a good thing to be working for. Personally, I tend to wrap all my keys up in a single struct, so my code looks more like this:
[gist https://gist.github.com/grey280/77bccd85bb1843dbd7360f7e9eecc38a /]
That’s a matter of personal taste, though.
You might also have noticed that I made both the keys and the UserDefaults.standard private — I’ve set myself a policy that any access of UserDefaults that I do should be via this Settings class, and I make it a rule that I’m not allowed to type UserDefaults anywhere else in the app. As an extension of that policy, anything I want to do through UserDefaults should have a wrapper in my Settings class, and so private it is: any time I need a new setting, I write the wrapper.
There are a few more implementation details you can choose, though; in the example above, I made the accessors static, so you can grab them with Settings.storedSetting. That’s a pretty nice and easy way to do it, but there’s a case to be made for requiring Settings to be initialized: that’s a great place to put in proper default values.4
[gist https://gist.github.com/grey280/c067ec6f165e498f4a8e0a01164a74eb /]
In that case, accessing settings could be Settings().storedSetting, or
[gist https://gist.github.com/grey280/0080b5a0cfeb3d56e1140c81eec1edb4 /]
You could also give yourself a Settings singleton, if you like:
[gist https://gist.github.com/grey280/e393bc00557a0c24e407d25dc2b4cecb /]
I don’t have a strong feeling either way; singletons can be quite useful, depending on context. Go with whichever works best for your project.
And finally, the nicest thing about writing this wrapper: you can save yourself a great deal of repeated code.
[gist https://gist.github.com/grey280/2395469f039d96ba1e4d3558a74a839f /]
Or, if you don’t want to have a default return, make it optional, it’s not much of a change:
[gist https://gist.github.com/grey280/c03eb527f9ec5d7fb15d519563085875 /]
You can also do similar things with constructing custom classes from multiple stored values, or whatever else you need; mix and match to fit your project.
(Thoughts? Leave a comment!)


  1. If you’ve ever run defaults write from the Terminal, that’s what we’re talking about. 
  2. If it matters, it’s also not synced; the defaults database gets backed up via iCloud, but if you want syncing, Apple recommends you take a look at NSUbiquitousKeyValueStore
  3. If you want your preferences shared between your app and its widget(s), or between multiple apps, you need to create a custom suite; each app has its own sandboxed set of defaults, which is what UserDefaults.standard connects to. 
  4. UserDefaults provides default values, depending on types, but they may not be the same defaults that you want. If you want a stored NSNumber to default to something other than 0, you’ll need to do that initial setup somewhere. 
Categories
Technology

iOS Notification Routing

The other day I was thinking about the way iOS handles notifications; the new Do Not Disturb stuff in iOS 12 is a good start, but it’s still rather lacking. It’s a fun thought exercise: say you’re Jony Ive or whoever, and you’re setting out to redesign the way that notifications work, from a user standpoint.1 How do you make something that offers advanced users more power… but doesn’t confuse the heck out of the majority of your user base?
After a while dancing around the problem, I came to the conclusion that you don’t.23
Instead, imagine something more along the lines of Safari Content Blockers. By default, the existing system stays in place, but create an API that developers can use to implement notification routing, and allow users to download and install those applications as they so desire.4
Obviously, this would have some serious privacy implications — an app that can see all your notifications? But hey, we’re Jony Ive, and Apple has absolute control over the App Store. New policy: Notification routing apps can’t touch the network.5 And, to prevent any conflict of interest stuff, let’s just say that the routing apps aren’t allowed to post notifications at all.
Alright, we’ve hand-waved our way past deciding to do this, so let’s take a look at how to do it, shall we?
Let’s start with the way notifications currently work. From UNNotificationContent we can grab the properties of a notification:
[gist https://gist.github.com/grey280/f12f2abe57826f2b3efdc30cebc3d834 /]
For proper routing, we’ll probably want to know the app sending the notification, so let’s add the Bundle ID in there, and we’ll also give ourself a way to see if it’s a remote notification or local.
[gist https://gist.github.com/grey280/d60ea7481dd312bd6f4e7d6ad3e4ae4a /]
Alright, seems nice enough.6
Next up, what options do we want to have available?
1. Should the notification make a sound?7
2. Should the notification vibrate the phone?
3. Should the notification pop up an alert, banner, or not at all?
4. If the user has an Apple Watch, should the notification go to the Watch, or just the phone?
5. Should the notifications show up on the lock screen, or just notification center?
6. Finally, a new addition, borrowing a bit from Android: which group of notifications should the notification go into?8

Alright, that should be enough to work with, let’s write some code.
[gist https://gist.github.com/grey280/8dac8866a736c886a66079ff58b9d34b /]
Not a complex object, really, and still communicating a lot of information. I decided to make the ‘group’ aspect an optional string — define your own groupings as you’d like, and the system would put notifications together when the string matches; the string itself could be the notification heading.9
And with that designed, the actual routing could just be handled by a single function that an application provides:
[gist https://gist.github.com/grey280/309a5f459dc207542c4f98c27bcd0c2c /]
And with that, I’d be free to make my horrifying spaghetti-graph system for routing notifications, and the rest of the world could make actually sensible systems for it.
Thoughts? There’s a comment box below, I’d love feedback.


  1. I haven’t done much work with the UserNotification framework, so I’m not going to be commenting on that at all. 
  2. I spent a while mentally sketching out a graph-based system, somewhere between Shortcuts and the pseudo-cable-routing stuff out of Max/MSP, but realized pretty quickly that that’d be incredibly confusing to anyone other than me, and would also look very out of place in the Settings app. 
  3. As a side concept, imagine that but implemented in ARKit. “Now where did I put the input from Messages? Oh, shoot, it’s in the other room.” 
  4. Unlike Safari Content Blockers, though, I think this system would work best as a “select one” system, instead of “as many as you like, they work together!” thing. Mostly because the logistics of multiple routing engines put you back in the original mess of trying to design data-flow diagrams, and users don’t want to do that. Usually. 
  5. I’d call this less of an ‘App Store’ policy and more of a specific entitlement type; if you use the ‘NotificationRouting’ entitlement in your app, any attempt to access the network immediately kills the application. 
  6. Of course, those last two additions wouldn’t be things that you’d be able to set while building a UNNotificationContent object yourself, so perhaps we should be writing this as our own class; UNUserNotification perhaps? 
  7. We’ll assume that setting notification sounds is handled somewhere else in the system, not by our new routing setup. 
  8. This would be at a higher level than iOS 12’s new grouped notifications (the stacks), more like the notification channels in Android: categories like ‘Work’, ‘Family’, ‘Health’, and so on. 
  9. Since we’re Jony Ive, and everything has to be beautiful, we’re presumably running it through some sort of text normalization filter so people don’t have stuff going under the heading “WOrk” 
Categories
Technology Tools

Automatic OCR with Hazel

I recently got a copy of Hazel and have been doing a bit of tinkering around with various ways to automate my file management. Because, y’know, I can do it by hand, but why would I when I can make a computer do it for me? That’s the whole point of computers, after all.
I have a great deal of PDFs — something about scanning every paper, handout, receipt, or bit of mail I’ve received in the past six years or so does that. And if you have a commercial-grade scanner, it can be pretty easy to automate that stuff with Hazel, as the scanner will run everything it scans through Optical Character Recognition, and the PDF you’ll get will be nicely searchable.1
Unfortunately, the scanner I’ve got, while a pretty good one, is in a different price tier than the ones that’ll do the automatic OCR, so I needed a way of doing that after the fact.
There are some guides to doing that, such as this one,2 but they tend to require either Acrobat Pro or PDFPen Pro, which both have price tags above the “a couple hours of tinkering and no money” that I was hoping to spend on this project.
Throw a few computer science keywords on what you’re Googling, though, and you’ll find stuff that’s more in that vein.3 So, compiled here after I used Chase as a guinea pig, a guide to putting together automated OCR for free.4

Prerequisites

Before we can automate OCR, we need a few things installed. Open up Terminal, and let’s go.
sudo easy_install pip
(For those of you who didn’t put a few years into classes on computer science, I’ll try to explain as I go along. That first word, sudo, means “super user do”, basically; it’s the Admin Override for terminal commands. Be careful with it, you can make quite a mess tinkering with it. The next bit, easy_install, is part of the version of Python that comes default with macOS. pip is what we’re telling easy_install to install; ironically, pip is the modern version of easy_install.5)
The first time you use sudo in a Terminal session, you’ll be prompted for your password; if you’re not an administrator on the mac you’re using, you’ll need an administrator password. That’s a good opportunity to check with the administrator if this is something you should be doing at all.
Once pip is done installing, we’re going to get another installation helper, Homebrew:
sudo /usr/bin/ruby -e "$(curl -fsSL https://raw.githubusercontent.com/Homebrew/install/master/install)"
Again, this is just installing a piece of software, Homebrew.

Components

Now that we’ve got the infrastructure built, we’re going to install the components that the OCR system uses.
brew install tesseract
brew install ghostscript
brew install poppler
brew install imagemagick
(If any of those fail, you can try to rerun them with sudo added to the front, i.e. sudo brew install tesseract.)
For reference: Tesseract is the actual OCR engine, Ghostscript makes it easier to interact with the PDF format,6 Poppler is similarly PDF-related, and ImageMagick handles conversion between basically any types of images.
Finally, we’ll use pip to install a specific version of another:
sudo pip install reportlab==3.4.0
ReportLab is yet another PDF-related library, but version 3.5.0 has some compatibility issues with the OCR system.

Installation

Finally, we’ll get the actual thing that ties these all together:
sudo pip install pypdfocr
PyPDFOCR is a lovely open-source project that ties all these components together into a single thing. Once it’s installed, you can use it from the terminal:
pypdfocr {filename}, where you replace {filename} with the non-OCR’d version of the file you want in OCR’d form.7 It’ll take a bit to run, but once it’s done, you’ll have a file (named {filename}_ocr.pdf) that contains, hopefully, the text of the document you scanned.89
Go ahead and test it; if you get an error about the file not being found, see if the file name or directory structure included a space. If it did, tweak the command a bit: instead of pypdfocr {filename} you’ll need to do pypdfocr "{filename}".
You may also get an error that mentions File "/Library/Python/2.7/site-packages/pypdfocr/pypdfocr_pdf.py", line 190… and a bit more after that. If it’s AttributeError: IndirectObject…, then you’ll need to tweak part of the code.10
cd /Library/Python/2.7/site-packages/pypdfocr
sudo nano pypdfocr_pdf.py
That’ll open up nano, a very lightweight text editor. Press control+W, type in orig_rotation_angle = int(original_page.get and hit return; this will take you to the line we want to edit. It’ll read orig_rotation_angle = int(original_page.get('/Rotate', 0)) — we want to change it to orig_rotation_angle = int(original_page.get('/Rotate', 0).getObject()) by adding .getObject() before the last close-paren.
Once you’ve done that, press control+X, then hit return again. Try OCRing something again; it should work this time.

Using Hazel

Now all you need to do to have Hazel automatically OCR a PDF is, in the actions, add a “Run shell script” action, use “embedded script”, and in the ‘edit script’ bit, put in pypdfocr "$1".
Keep in mind, this doesn’t replace the PDF in place, it’ll create a copy with _ocr added to the end of the name. If you’d like the original to be deleted once it’s done, rather than having Hazel do it, just add a second line to the embedded script: rm "$1"
You’ll probably want another rule to move the OCR’d versions somewhere else; while you’re building that, you can also use the ‘rename’ action to remove the _ocr bit, just tell it to replace “_ocr” with “”.
Have fun automating!


  1. And, as a result, useable for Hazel sorting by way of the ‘contents’ filter. 
  2. I was hoping to link to Katie Floyd’s original post about it, but her website is down at the moment, so I guess I won’t be doing that. 
  3. Technically speaking, I think all I added was “site:github.com”, but that did the trick. 
  4. This assumes you have a Mac, since you’re working with Hazel, and that you’re willing to do a bit of tinkering in the terminal, which I also kinda assumed, since you’re working with Hazel. 
  5. I think that’s irony; I was a computer science major, not an English major. 
  6. “the Printable Document Format format” 
  7. Tip: you can type pypdfocr  (including the trailing space) and then drag-and-drop the PDF from Finder into the Terminal, and it’ll automatically fill in the filename. If any part of the path includes a space, though, it’ll fail, so for filenames or folders that contain spaces, do pydpfocr "{filename}" – type pypdfocr ", drop in the file, and then ", and then hit enter. 
  8. Caveat: Tesseract isn’t perfect, especially with regard to the formatting, so don’t expect this to give you a perfectly-formatted version of whatever you scanned. That said, the process is lossless: {filename}_ocr.pdf is built by taking the original PDF file and then adding an invisible text layer over the analyzed text, so you won’t lose any information by doing this, you just might not gain anything useful. 
  9. Note that it’ll spit {filename}_ocr.pdf out not necessarily where the original file was, but wherever the Terminal session currently is; if you’re unsure about where that is, you can use pwd to have it displayed, or just open . to open it in Finder. 
  10. Don’t ask me why this is all “you might have to do this”, because I genuinely don’t know why this problem only pops up some of the time. 
Categories
App Portfolio Technology

Fluidics 1.1: The Animation Update

The first major update to Fluidics is now available on the App Store!1 In all honesty, it was largely a ‘bug fixes and performance improvements’ update, but I’ve always hated when app updates list that, so I made sure to include a couple user-facing features so there’d be something fun to talk about, at least.
In this case, those features were animations. The most notable is the background – rather than being drawn once, the ‘water’ in the background is now animated, which I think makes the visual effect much nicer overall. Swiping between the three main pages of the app is also much smoother now; instead of a single ‘swipe’ animation being triggered by any swipe, it directly responds to your swipe, so you can change your mind about which direction to swipe halfway through, and it feels more like you’re moving things around, rather than switching pages.2
The big changes, though, are largely invisible; a whole lot of work on the internals to allow for future features I’m planning.3 The gist of it is that a lot of the internals of the app are now a separate library, which means I can share code between the widget and the main app without needing to copy-and-paste all the changes I make in one place to the other.
Past that, there were a couple little tweaks — the algorithm that calculates the water goal is a bit less aggressive with the way it handles workout time, and there’s now a little “this isn’t a doctor” disclaimer in the Settings page that I put there because the lawyer I don’t have advised that I do that.
And, the bit that turned into more of a project than I thought: VoiceOver support. VoiceOver, for those that don’t know, is one of the core accessibility features of iOS; when enabled, it basically reads the contents of the screen to the user, making it possible for visually-impaired people to use iOS. By default, any app built on UIKit has some support for VoiceOver, but the further you go from the default controls, the more broken that’ll get. The way Fluidics works, it was super broken; technically useable, but downright painful to do. After a day or two of vigorous swearing and arguing with the Accessibility framework, I’m proud to say that Fluidics is now VoiceOver-compatible.
If you’ve already got Fluidics on your phone, it’s a free update from the App Store.4 If not, the whole app is a free download from the App Store, and I’m hoping that you’ll enjoy using it. Leave a review or whatever; I’m trying not to be pushy about that.
Oh, and I’m in the process of updating the app’s website; I got such a good URL for it that I want it to look good to match.


  1. There was a bugfix update earlier, version 1.0.1, but that’s not at all exciting, so I didn’t bother writing anything about it. 
  2. If you’re curious, this involved rebuilding the entire interface, from three separate pages that’re transitioned between to a single page that’s embedded in a scroll view. 
  3. And no, I won’t be telling anybody what those are just yet; I don’t want to promise anything before I know for sure it’ll be possible. 
  4. In fact, it may have already been automatically updated — the easiest way to tell is to open the app and see if the water is moving or not. 
Categories
App Portfolio Technology

Open-sourcing Variations

Now that the whole concert is over, and I’ve finished going through approximately all of the WWDC sessions, I’ve decided that Variations won’t be receiving any further development — it wasn’t going to be enough of a priority for me to do it any justice, and I’d hate to half-ass it.1 The app will remain on the App Store, for now, though if it breaks in future iOS versions, I’ll probably pull it entirely. Instead, I’m releasing the source code, as-is; if you’d like to look through it, it’s right here.
I had fun building it, and I like to think that it does some interesting things with the implementations under the hood, so hopefully somebody can find some use from it.


  1. This is, hopefully, a hint about some of my other projects that are a higher priority; announcements of those will, of course, show up on this here blog. 
Categories
App Portfolio Technology

Fluidics

I made an app! I’m quite excited about it; this is, after all, the sort of thing I want to spend my career doing.

The app is called Fluidics, and it’s for tracking the amount of water you drink. As I mentioned a while back, I like to do a lot of tracking of what I’m eating and how much I’m drinking. That first part wasn’t too hard; there’s a variety of apps on the App Store for logging food, and after a while I was able to find one that wasn’t too bad.1 For water, though, nothing quite worked – Workflow came closest, but using it to do the sort of goal calculations I wanted was on the line between clunky and painful, and it’s such a general-purpose app that it felt visually lacking.
Eventually I remembered that I’m a computer science major, and why am I sitting around complaining about the dearth of options when I’ve basically got a degree in making the dang thing. Months of sketching, programming, swearing, and repeating the whole thing eventually lead to this: what I hope is the easiest water-tracking app on the App Store to use.
It’s been a fascinating process. (Here, by the way, is where I’m going to take advantage of the fact that this is my blog for rambling and start talking about what it was like making it; if you’d like to get more information on the app, I’ve put together a rudimentary website, or you can skip straight to the ‘it’s free on the App Store’ part and give it a whirl.) As it turns out, there’s a whole lot of work involved in making an app; my original sketch was the widget and two screens. Those came together pretty quickly, but I realized that probably nobody would feel comfortable using an app if the first time they opened it it just threw up a message saying “trust me!” and then asked for a bunch of health information, so I wrote up a privacy policy and started building an onboarding flow. Which then ballooned in complexity; looking at the design files, more than half of the app is screens for dealing with something having gone wrong.2
One of the most interesting debates I had with myself during the whole process was deciding what business model to use.3 The App Store has had an unfortunate tendency to be a race to the bottom; while there’s a bit of a market for pro apps, a minimalistic water-tracking app doesn’t fit into that category. There’s also no argument to be made for a subscription, so I’d narrowed it down to ‘free, because I’m turning it in as the capstone project for my computer science major’, ‘free with ads’, or ‘paid up-front’. The first one was the one I was most comfortable with; sure, ‘paid up-front’ would be nice, but I’d also get approximately zero people to download it what with all the free competitors out there. ‘Free with ads’ feels deeply gross, both because I hate online advertising in general, and because I’m doing a lot with health data, and I really don’t want to have any chance of that getting stolen. For a while, I thought it was going to be ‘free forever’, and I’d be justifying it as ‘building a portfolio’.
That wasn’t what I actually settled on, however; instead, I’m going with ‘free with in-app purchase.’ Instead of building in a paywall and locking some features behind it, though, I decided I’d go simpler; the app and all of its features are free. Starting in version 1.1, there’ll be a button in the Settings; a little tip jar.4 I probably won’t make much, but I’ll feel better about it overall, and what’s the harm?
Beyond that debate, most of the challenge of the project as a whole was just building it. I knew going in what I wanted it to look like; what I didn’t know was how to go about doing that. The way the background overlaps the text? That alone took a week of trying different things to get working right.5 A few things I wanted to include in the first version didn’t make it – the widget was originally going to be entirely different, but the way Apple has done the security on health data makes the original design significantly more difficult to do, so I switched it to the current design.6
It was definitely a learning experience, too – I’d done some iOS application design for classes before, but never gone all-in on making something that would be both functional and enjoyable for the end user. If you’re releasing something on the App Store, you can’t just include a note that says “on first run, it’ll ask for a bunch of permissions; just say yes” because nobody will read that. And getting something uploaded to the App Store is itself a whole process – the App Store page doesn’t fill itself out, after all, and copywriting definitely isn’t my strongest suit.7
But it’s done; I’ve made an app and released it to the world. 8 By the time you’re reading this, it should be available on the App Store; as I mentioned, it’s free to download, and I’d love it if you’d give it a try.


  1. That said, I’m also doing some design sketches for my own entry into the field; don’t get your hopes up, I make no promises. 
  2. I’m not talking “my code is full of bugs and something crashed” went wrong, either; it’s all “the user originally gave permission to do something, but then changed their mind and used the Health app to take it away” and other such nonsense. Computers may be finite-state machines, but “eleventy hojillion” is still a finite number. 
  3. I also talked about this a lot with my friend Chase, without whom I would’ve long ago given up on technology and disappeared into the woods to be a Bigfoot impersonator.. 
  4. Yes, I know, I’m just now releasing version 1.0, and I’m already mentioning plans for 1.1. Don’t worry, I’ve got versions 1.2 and 1.3 mapped out, feature-wise, as well, and have some rough ideas for 1.4. 
  5. For a while I thought I was going to have to write code to draw the numbers ‘by hand’; fortunately, I was able to get the drawing to work by taking advantage of layer masks, but good lord are the Interface Builder files a mess as a result. Behind The Scenes, everybody! 
  6. I do still want to get the original design working, probably as an option in the Settings page of the app; a future version is going to add watchOS support, and I believe that a lot of the work I’ll have to do for that will also apply to making the widget work like I intended, so those two will either be the same or subsequent updates. 
  7. Another shoutout to Chase, who wrote the App Store description and turned my pile of 100 disjointed screenshots into the four that’re currently on display. 
  8. Well, “done”; it’s functional and available to the public, but software, as the saying goes, is never finished, only abandoned. I’ve no plans to abandon this project anytime soon; I use it myself several times a day, so I’m pretty invested in keeping it working and making it better. 
Categories
Technology

Tidbits from Apple’s Machine Learning Journal

A short while ago, Apple launched a journal on machine learning; the general consensus on why they did it is that AI researchers want their work to be public, although as some have pointed out, the articles don’t have a byline. Still, getting the work out at all, even if unattributed, is an improvement over their normal secrecy.
They’ve recently published a few new articles, and I figured I’d grab some interesting tidbits to share.
In one, they talked about their use of deep neural networks to power the speech recognition used by Siri; in expanding to new languages, they’ve been able to decrease training time by transferring over the trained networks from existing language recognition systems to new languages.1 Probably my favorite part, though, is this throwaway line:

While we wondered about the role of the linguistic relationship between the source language and the target language, we were unable to draw conclusions.

I’d love to see an entire paper exploring that; hopefully that’ll show up eventually. You can read the full article here.
Another discusses the reverse – the use of machine learning technology for audio synthesis, specifically the voices of Siri. Google has done something similar,2 but as Apple mentions, it’s pretty computationally expensive to do it that way, and they can’t exactly roll out a version of Siri that burns through 2% of your iPhone’s battery every time it has to talk. So, rather than generate the entirety of the audio on-device, the Apple team went with a hybrid approach – traditional speech synthesis, based on playing back chunks of audio recordings, but using machine learning techniques to better select which chunks to play based, basically, on how good they’ll sound when they’re stitched together. The end of the article includes a table of audio samples comparing the Siri voices in iOS 9, 10, and 11, it’s a cool little example to play with.
The last of the three new articles discusses the method by which Siri (or the dictation system) knows to change “twenty seventeen” into “2017,” and the various other differences between spoken and written forms of languages. It’s an interesting look under the hood of some of iOS’ technology, but mostly it just made me wonder about the labelling system that powers the ‘tap a date in a text message to create a calendar event’ type stuff – that part, specifically, is fairly easy pattern recognition, but the system also does a remarkable job of tagging artist names3 and other things. The names of musical groups is a bigger problem, but the one that I wonder about the workings of is map lookups – I noticed recently that the names of local restaurants were being linked to their Maps info sheet, and that has to be doing some kind of on-device search, because I doubt Apple has a master list of every restaurant in the world that’s getting loaded onto every iOS device.
As a whole, it’s very cool to see Apple publishing some of their internal research, especially considering that all three of these were about technologies they’re actually using.


  1. The part in question was specific to narrowband audio, what you get via bluetooth rather than from the device’s onboard microphones, but as they mention, it’s harder to get sample data for bluetooth microphones than for iPhone microphones. 
  2. Entertainingly, the Google post is much better designed than the Apple one; Apple’s is good-looking for a scientific journal article, but Google’s includes some nice animated demonstrations of what they’re talking about that makes it more accessible to the general public. 
  3. Which it opens, oh-so-helpfully, in Apple Music, rather than iTunes these days. 
Categories
Technology

TARS

I’d forgotten how much I enjoyed Interstellar, and then I went and watched this video. It’s a behind-the-scenes bit on TARS and CASE, the robots in the film. Those ‘bots were, of course, one of my favorite aspects of the whole thing.
They were so well-executed, and a lovely counterpoint to David in Prometheus. David was skeumorphism to the extreme, designed to look exactly like a human. When he (spoiler alert) gets damaged, you see a lot of biotech internals, nanowhatever and fluid that doesn’t look like blood, but definitely doesn’t look like oil.1

Categories
Technology

Cities: Skylines

I may or may not have spent four hours yesterday playing Cities: Skylines. It was, to me, a worthwhile use of my time.1 The game is very enjoyable, and I’m planning to spent a lot more time playing it over the next week.2

Seriously, go check it out.3 The game’s really nice, looks great, and runs on approximately every operating system.4 I had fun gaming on my MacBook5 – it is what I refer to as a beast of a machine, because it’s got the best specs you can cram into a MacBook without doing your own modifications, and it runs the game at near-maxed settings with ease. Sure, the fan is screaming and the battery percentage drops faster than a lead weight in a vacuum, but I’m gaming on a laptop, so I really can’t expect more.

I’ve got one or two issues with the game, but they don’t come up until later – the most noticeable is the same thing that my favorite “reviewer” mentioned when he talked about it – there’s no real way to lose. No disasters, and no negative levels on the RCI demand.6 Now, I’m not really complaining about the lack of disasters – I was always too frustrated by them in SimCity 4, because the learning curve on that game was too steep for me to ever really get off the ground. Cities is distinctly easier – more ‘casual,’ I’d say. And I like that lot.

Oh, right, I said I had one other issue, although it’s not technically an issue with the game. I wanted to tinker with the sandbox-style settings, so I used the built-in mods7 to give myself unlimited money and unlock everything. Except… the ‘unlock everything’ one only pushed the population numbers to max just long enough to hit those unlocks. Plenty of things were still locked due to not having hit their prerequisites, and that really bothered me. Mostly because I just wanted to build the fusion reactor, and I couldn’t! It was very tragic.

Oh well, I got to build a space elevator at least, so I’m still happy. It’s a good game, and now I’m going to go write a paper so I can play some more. Priorities!


  1. I don’t do much gaming anymore because I’m so very busy, and I tend to find lower-time-useage ways to get rid of my stress. 
  2. Some people party over spring break. I am not one of those people. 
  3. Today the link is to the Humble Store, instead of AmazonSmile. Humble has a lovely bit in their checkout process where they split the proceeds of the sale between the developers, a bit to ‘keep the servers running,’ and the rest to charity. Plus, you get Steam keys! 
  4. I believe it’s listed as being compatible with Linux, though I’m not sure which distros. If you’re running linux, though, I figure you’re smart enough to make it work. 
  5. If you’re going to be gaming on a MacBook, though, go into Steam’s settings and disable the in-game overlay, then quit out of Steam, then use Activity Monitor to force quit the inevitable bits of Steam that locked up instead of closing, then reopen steam, then launch the game. Otherwise, it’ll crash instantly. Shoutout to Valve, you’re doing good work over there.  
  6. Okay, there’s clearly negative numbers, but they aren’t visible to the user, they’re just used to run the internals. I can tell by the way the demand for everything says ‘zero’ but the map says ‘all these buildings are being abandoned because nobody wants them.’ 
  7. Somehow that feels wrong to say. 
Categories
Technology

In My Dock

I’ve done a post about all the different text editors I have on my laptop1, but today I’m going to talk about the general programs I’ve got. Specifically, which ones are in my Dock.

First, some of the stuff that isn’t technically in the Dock, but rather the bar at the top of the screen.2 Day One is present, followed by f.lux, Dropbox, OneDrive,3 and then the various system utilities.

Now, in the Dock itself. Finder, of course, then Chrome. Because internet addiction.

Then we’ve got Airmail 2, a lovely replacement for Mail.app, which I wound up switching to after a combination of ‘weird Yosemite bug’ and the WiFi at my work blocking Exchange servers4 rendered it unusable. Airmail has a nice interface and helps keep me organized, and it works nicely with Outlook on iOS, which I’m using as a replacement for the combination of Mail.app iOS and Google Inbox.

Next on the Dock is Things, a handy little to-do list app. The ‘add a task anywhere’ function is pretty handy, and it syncs nicely to the iOS app. It’s also very expensive, as far as apps go, and I wound up getting it as part of a bundle of software which helped me save a lot.

Following Things is Messages, which I mostly use for sending memes to people. I can’t be productive all the time.

Then there’s Typed, the new addition to the ‘text editors’ list. I’m gonna go ahead and throw in a mention for Mou here, because, while it isn’t on my Dock anymore, I still use it all the time – I tend to switch back and forth between those two all the time. I like Mou’s interface better, but Typed can maintain a framerate above ‘5 fps’ when viewing/editing large documents, so…

Then there’s iTunes, which I’ve also talked about in the past. Then there’s Day One, once again, since sometimes the widget isn’t enough.

Then Desk, another of the text editors from the previous post, which I’m actually writing this in.5

OneNote follows Desk, and I swear, one of these days I’m going to actually type up that backlog of notes I’ve got in my atrocious handwriting. Someday. Soon, I promise.

Then Calendar, which I use way too much. My calendar looks like I’ve got at least one secretary whose only job is to fill in my calendar. It’s… a bit sad, honestly.6

Finishing up, we’ve got System Preferences, because I feel like no Dock is complete without it, and Activity Monitor configured to show CPU usage in the icon, something that I have set up in some form or another on any computer I use.

So, that’s my software setup. I’ve got a lot more stuff installed, but those are the things I use enough to justify having them in my Dock. What’s your setup look like, dear reader?


  1. Which I could actually update now because I’ve got at least one new one since then… 
  2. There’s a specific term for that bar, but I can’t remember what it is and I refuse to spend ten minutes Googling that sort of thing. 
  3. When it hasn’t crashed, so… roughly 30% of the time? 
  4. That is exactly as ridiculous as it sounds. Probably more, actually. 
  5. There’s a bug in the Markdown rendering engine at the moment, so I can’t use the built-in ‘post’ functionality, but I still like the interface so much that I’m doing all my blog-post writing in Desk and then copy/paste-ing it into the WordPress installation here. 
  6. It’s also a lot of fun to show people and watch the pity appear. 
Categories
Technology

This Month's Playlist

I use iTunes a lot.1 Like, a lot. I don’t think I’ve ever had it closed on this computer.

Why? you may ask. Well, I like music. Hopefully you’ve figured that out by now, since I listed a music textbook in the ‘what I’m reading’ thing earlier, and I’m sure I’ve mentioned how many music classes I’m taking somewhere.2 It’s what I use to play music on my laptop, and it’s what I3 use to keep my music library organized.

It’s a respectably-sized music library, at that: 2,100+ songs at the moment, and it’ll probably keep going up.4 So, what’s up with the title of this post?

Well, I make a new playlist every month. For a while, I just had one playlist,5 but I got tired of that after a while. 300 songs in one playlist seemed like a bit much, especially when I’d be listening to it on my phone, spot a song that I didn’t want on there… and then forget before I could do anything about it when I got back to my laptop. This way, it’s always fresh; a song I don’t like will be on my playlist for a month at the most,6 and whenever I get some new music I like, the smaller size of the list means that I’ll be able to hear it much more frequently.7

The other really cool benefit of this system, to me at least, is the fact that I can look back and see what I was listening to at any time. I’m a big fan of the whole ‘quantified self’ thing – my phone tracks my steps and distance walked, and I use an app to keep track of what I eat just because I like looking at the charts – and this is, to Grey-the-vague-audiophile a very cool thing.

Anyhow, readers, since I know there’s at least one of you out there – what’s your system for music? Pandora list? Thousands of playlists for every possible mood? Something I haven’t thought of because I only listed three ideas? I’d like to know, so hit up that comment box.


  1. It’s a much less terrible program if you’re using Mac OS X instead of Windows; I’m convinced that Apple was so intense about having it look like it was on OS X that they actually wrote the entire OS X windowserver system into the program and then run iTunes within that. 
  2. If I haven’t, I’m taking 6 music classes at the moment. That in addition to working for the music department at school. 
  3. As someone with not-actually-OCD-stop-calling-it-that, or “I prefer things to be organized, but I don’t compulsively clean them.” 
  4. The nice thing about the remixes that I’m partial to at the moment is that, thanks to copyright law, they’re generally free to download. 
  5. Titled “Main Music List” because I am super creative you guys 
  6. Just because I’ve changed tactics doesn’t mean I’m any less forgetful. 
  7. Handily increasing the efficiency of the whole “repeating a song until I can no longer listen to it because I hate it so much” thing. Y’know, like Owl City’s Fireflies